
From concept to product
From prototyping to production, our production sites can handle all your manufacturing projects.
What is 3D Printing?
The short answer
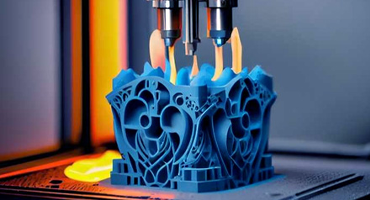
3D printing, or additive manufacturing, builds a part by adding material one thin layer at a time from a digital model instead of cutting it out of a block. Layers run about 20 to 300 micrometres, the part is finished in hours, and the bond between layers is its weakest plane.
From a digital model to a solid part: four stages
The word printing is misleading, because nothing is printed onto paper. A solid model is cut into horizontal slices by software, and a machine then deposits, fuses or cures material one slice at a time until the slices stack into the finished shape. The four stages below are the same whether the machine costs USD 300 or USD 800,000.

- Model. The part is designed in CAD and exported as a mesh (STL, 3MF) or as exact geometry (STEP). What matters is that the model is a closed solid with no gaps, no loose faces and the right units — a file exported in inches and read in millimetres comes out 25.4 times the intended size.
- Slice. Slicing software cuts the model into layers and calculates the path for each one. This is where layer height, wall count, infill, top and bottom skins, support strategy and orientation are set, and those five settings decide most of the part's strength, finish and build time.
- Build. The machine adds material layer by layer: a heated nozzle lays down molten thermoplastic, or a light source cures liquid resin, or a laser fuses powder. Each layer bonds to the one below it, and that bond is the part's weak plane.
- Finish. Supports are removed, powder or resin is cleaned off, and the part may be cured, sanded, smoothed, dyed, heat-treated or machined on critical faces. Post-processing is where as-built accuracy is corrected and where appearance is decided.
Additive against subtractive, and why the difference matters
CNC machining starts with a block or a bar and removes material until only the part is left; the removed material becomes chips. Additive manufacturing does the reverse. That single difference explains most of the strengths and most of the limits in one step, so it is worth putting the two side by side.

| Point of difference | Additive: 3D printing | Subtractive: CNC machining |
|---|---|---|
| How the part is made | Material added layer by layer | Material removed from solid stock |
| Material used | The part and its supports only | The part, plus chips and offcuts |
| Tooling needed | None: no mould and no fixture | Fixtures and cutting tools |
| Geometry reach | Internal channels, lattices, one-piece bodies | A cutting tool must reach the face |
| Typical tolerance | Plus or minus 0.05 to 0.5 mm | Plus or minus 0.01 to 0.05 mm |
| Surface as built | Ra 0.8 to 25 micron | Ra 0.4 to 3.2 micron |
| Weak point | The bond between layers | None introduced by the process |
| Best quantity band | One to a few hundred parts | One to hundreds of thousands |
Read the tolerance row first. Nothing printed off a standard industrial machine comes close to a machined fit, and the gap is roughly one order of magnitude. Then read the geometry row, which is where printing wins outright: a cutting tool has to reach every surface it produces, so internal passages, lattice cores and organic shapes are either impossible to machine or ruinously expensive to machine.
What the machine is actually doing, family by family
Seven process families are recognised under the ISO/ASTM 52900 framework, and five of them do almost all professional work. They differ in how material is joined, and the joining method sets the material list, the layer thickness and the achievable accuracy.
Material extrusion
A filament of thermoplastic is pushed through a heated nozzle that draws the cross-section bead by bead. Layers run 100 to 300 micrometres and tolerance is about plus or minus 0.2 to 0.5 mm. It is the only family that builds with genuine engineering thermoplastics such as ABS, polycarbonate and filled nylon, and it is the cheapest route to a large part. Its single weakness is the bond between beads.
Vat photopolymerisation
A platform sits just below the surface of a vat of liquid photopolymer, and light traces each cross-section and cures it. Layers run 25 to 100 micrometres and tolerance reaches plus or minus 0.05 to 0.1 mm, the tightest of the polymer routes, with as-built roughness as low as Ra 0.8 to 2.5 micrometres. Resin parts are precise and smooth but brittle, and they degrade under prolonged ultraviolet exposure.
Powder bed fusion
The best-known example is selective laser sintering of polymer powder at 80 to 150 micrometre layers; its metal equivalents fuse titanium, stainless steel, aluminium or nickel alloys at 20 to 60 micrometre layers. Unfused powder supports the part, so internal channels, hinges and interlocking assemblies can be built in one piece with no support marks. Sintered nylon PA12 reaches about 45 to 50 MPa tensile, and fully dense metal parts match wrought values.
Material and binder jetting
Droplets of photopolymer or binder are jetted onto a layer of powder or onto a build plate, and the part is cured or sintered afterwards. Tolerances are typically plus or minus 0.1 to 0.5 mm. The family is used for multi-colour and multi-durometer models, and for sand moulds and batch metal parts.
Directed energy deposition
Metal powder or wire is blown into a moving melt pool created by a laser, electron beam or arc, building layers from 500 to 2,000 micrometres. Accuracy is loose at plus or minus 0.5 to 1.5 mm, but the deposition rate is far higher than a powder bed, so the family is used for large structures, feature addition onto forgings and repair of worn parts.
Where the accuracy comes from, and where it is lost
Buyers usually ask about layer height first and it is the setting that explains the least. Layer height sets vertical resolution and surface finish; it does not make a part more accurate in the horizontal plane, and halving it roughly doubles build time. Real accuracy is a stack of five decisions, and the table below lists them in the order they are usually made.

Post-processing is the lever most often left out of a quotation. A printed bore is undersized and has to be reamed; a printed sealing face is rough and has to be milled; a printed part carries residual stress that can move it after the build unless it is annealed. If a drawing has a real tolerance on it, assume a machining pass is part of the route.
What 3D printing does not do
- It does not hold machining tolerances. Additive routes hold plus or minus 0.05 to 0.5 mm depending on the family, against plus or minus 0.01 to 0.05 mm on a machined part. Features that mate, seal or locate are machined afterwards.
- It is not isotropic. Extruded and jetted parts are weaker across the layer boundary, typically 50 to 75 percent of bulk strength. Powder-bed and vat-cured parts are close to isotropic, but the layer direction still affects surface and support marks.
- It does not scale economically. There is no tool to amortise, so the unit price stays roughly flat. Above a few hundred to a couple of thousand parts, moulding or casting wins on unit cost.
- It does not replace the design rules. Thin walls below about 1 mm become a process variable rather than a drawing callout, fine threads print unreliably, internal channels must be designed so that trapped powder can be emptied, and unsupported overhangs distort.
- It does not arrive with material certification. A printed part is not wrought stock and does not carry a mill certificate. Where a programme requires that traceability, it is a requirement on the process, confirmed per programme and per factory in writing before production.
- It is not one process. Choosing between extrusion, resin, polymer powder and metal powder changes the material, the tolerance, the surface and the price by more than most design decisions do.
What to send for a printed part
Send a STEP file if the model came from CAD, a toleranced drawing, the quantity, the feature that has to be accurate and the environment the part will work in. Those five items decide the family before price is quoted: fine detail and a smooth surface point to resin, a part that flexes or takes an impact points to sintered nylon, a large or inexpensive part points to filament extrusion, and anything that has to be metal points to powder-bed printing followed by machining. See SLA resin 3D printing for fine detail, SLS 3D printing for durable nylon parts and FDM 3D printing for economical large parts, then send a model for a free engineering review.
Scope and sources. The four-stage build sequence, layer ranges and design levers were compiled in 2026 from a 3D printing process guide by Premsa Industries (FDM layers 0.1 to 0.3 mm, infill 15 to 40 percent, model export rules and the inches-versus-millimetres error) and from the ISO/ASTM 52900 seven-category comparison by AS Prototypes, which gives the layer, tolerance and material figures quoted by family (metal powder bed 20 to 50 microns at plus or minus 0.1 to 0.2 mm, vat photopolymerisation 25 to 100 microns at plus or minus 0.05 to 0.1 mm, material extrusion 100 to 300 microns at plus or minus 0.2 mm, binder jetting 50 to 100 microns at plus or minus 0.2 to 0.5 mm, directed energy deposition 500 to 2,000 microns at plus or minus 0.5 to 1.5 mm, SLS PA12 at 45 to 50 MPa, FDM polycarbonate at 55 to 70 MPa, DMLS Ti6Al4V at 1,050 to 1,150 MPa, as-built Ra 0.8 to 25 microns) and from a summary of polymer, resin and metal printing families. Practical limits — as-printed metal roughness around Ra 8 to 15 microns, wall thickness below about 1 mm behaving as a process variable, fine threads and H7 bores requiring a secondary machining pass, and residual stress moving a part after the build — come from a machining-side process explainer. The 50 to 75 percent interlayer bond-strength range is the figure quoted across the process guides above. These are typical published values for general-purpose industrial machines; orientation, material grade, geometry, parameter set and post-processing all move them, and none of the figures is a specification for a particular build. Nothing on this page states or implies a certification held by any supplier.
Are you looking for a reliable manufacturer of down home textile products?
We can quickly provide customers with market analysis, technical support and customized services.From concept to product
From prototyping to production, our production sites can handle all your manufacturing projects.
subscription