


DIY Guide: How to Fit a PAL Male to F-Type TV Antenna Cable for Perfect Reception
From Messy Wires to Perfect Signal: Your Ultimate Guide to Assembling a TV Antenna Cable
In the world of home entertainment, a clean setup is a happy setup. Whether you're connecting a new European television in North America or simply creating a custom-length cable for your antenna, knowing how to properly fit PAL and F-Type connectors is an invaluable DIY skill. While premade cables are convenient, they often leave you with excess length or fall short. This guide will empower you to create a professional-grade TV antenna cable with a PAL male connector on one end and an F-Type connector on the other, ensuring a perfect fit and optimal signal integrity. Say goodbye to signal loss and hello to crystal-clear picture quality.
Understanding the Connectors: PAL vs. F-Type
Before we get our hands dirty, it's crucial to understand the two connectors we're working with. The PAL connector, also known as a Belling-Lee connector, is the standard for terrestrial television in many parts of Europe, Australia, and Asia. It's a simple push-fit design. The F-Type connector, on the other hand, is a threaded connector that is the standard in North America for cable and satellite TV. Its screw-on design provides a more secure and robust connection, which is better at shielding against interference.
Gearing Up: Essential Tools and Materials
Having the right tools is half the battle. A professional result requires more than just a pair of scissors and hope. Here’s a breakdown of what you'll need for this project. Investing in these tools will pay dividends for any future coaxial cable work.
| Tool/Material | Purpose | Notes |
|---|---|---|
| RG6 Coaxial Cable | The main cable for transmitting the TV signal. | RG6 is the standard for modern digital TV and satellite. |
| Coaxial Cable Stripper | Precisely strips the outer jacket, shield, and dielectric. | A two or three-blade rotary stripper is highly recommended. |
| Compression Tool | Secures compression-style connectors to the cable. | Ensures a permanent, weather-resistant connection. |
| Cable Cutter | Provides a clean, round cut without deforming the cable. | Avoid using regular pliers which can crush the cable. |
| Compression PAL Male Connector | The push-fit connector end. | Ensure it is a compression type for RG6 cable. |
| Compression F-Type Connector | The threaded connector end. | Again, make sure it's a compression type for RG6. |
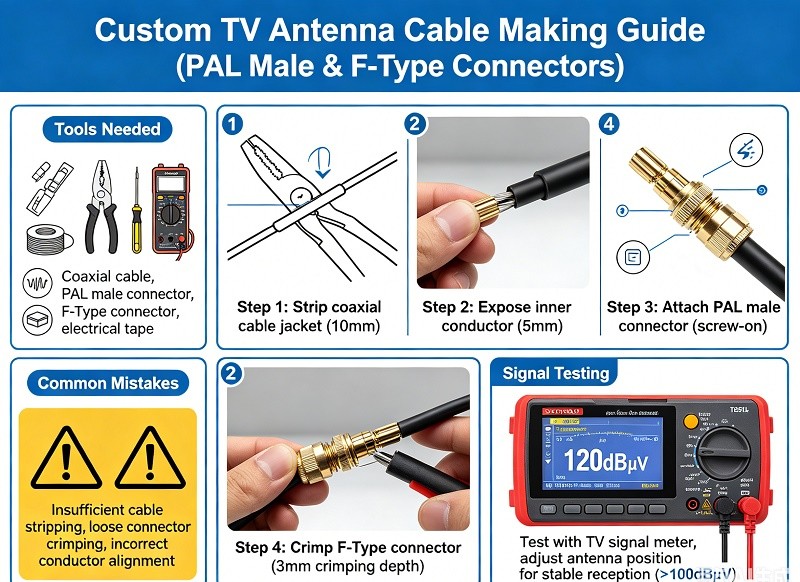
Step 1: Measure and Cut Your Cable
First, determine the exact length of cable you need. Run the cable from your antenna source to your television or set-top box. It's a golden rule of cabling to add a little extra length—about 1-2 feet (30-60 cm)—to allow for flexibility and prevent strain on the connectors. Once you have your measurement, use your dedicated cable cutter to make a clean, straight cut.
Step 2: Preparing the Cable End (The Critical Step)
Proper cable preparation is identical for both connector types and is the most critical part of the process. A poor strip will lead to a failed connection.
- Set Your Stripper: If you're using an adjustable rotary stripper, ensure the blade depths are correctly set for RG6 cable. You don't want to nick the center conductor.
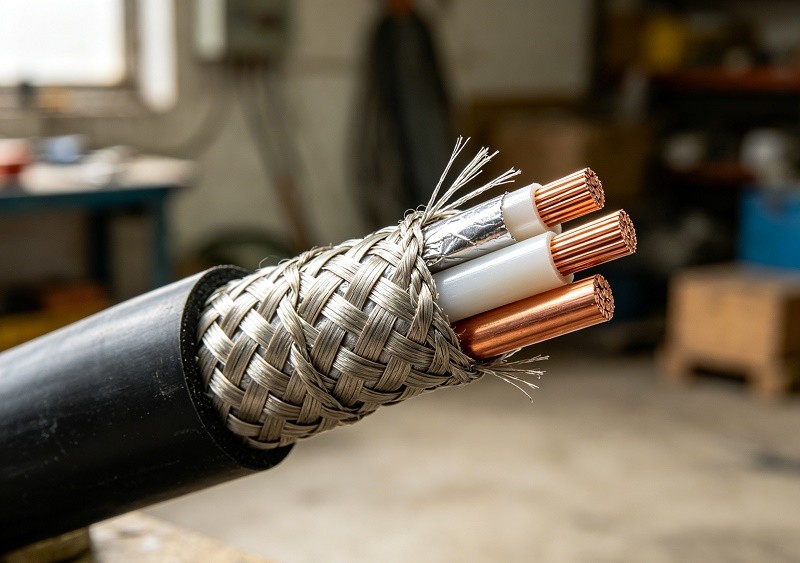
- Perform the Strip: Insert the end of the cable into the stripper and rotate it around the cable several times. When you pull the stripper off, it should have removed the outer jacket and cut the dielectric insulator, exposing the center conductor. A good strip will leave you with a stepped appearance: the copper core, the white dielectric, the braided shield, and the outer jacket.
- Tidy Up the Braid: Carefully peel back the braided shield over the outer jacket. Ensure no stray strands of the braid are touching the center conductor, as this will cause a short and a complete loss of signal.
Step 3: Attaching the F-Type Connector
We'll start with the F-Type connector as its design is foundational.
- Slide the Connector: Gently push the F-Type connector onto the prepared cable end. You may need to twist it slightly. The white dielectric should sit flush with the bottom of the connector inside. The center conductor will stick out of the end.
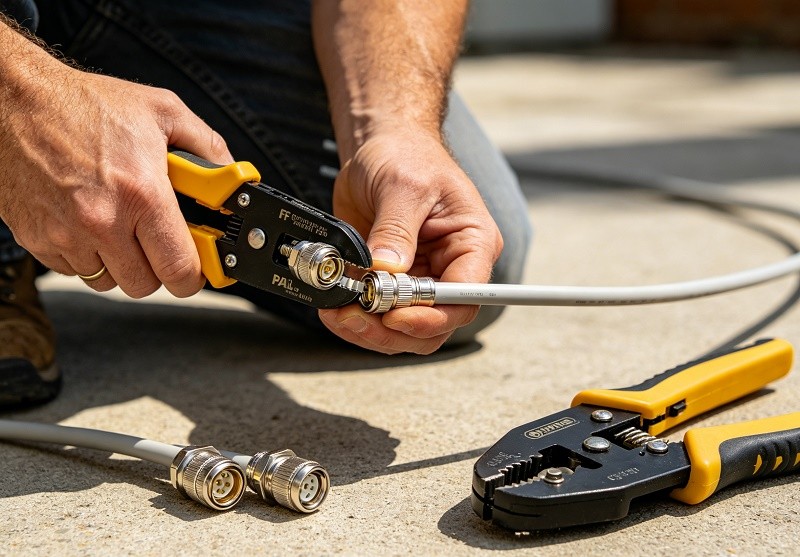
- Compress the Connector: Place the connector into the appropriate slot on your compression tool. Squeeze the handles firmly until the tool completes its cycle. This action permanently collapses the connector onto the cable, creating a secure and weatherproof seal.
- Trim the Conductor: Once compressed, trim the excess center conductor so it extends about 1/8 inch (3mm) beyond the end of the connector.
Step 4: Attaching the PAL Male Connector
The process for the PAL connector is nearly identical, assuming you are using a modern compression-style PAL connector.
- Prepare the Other End: Go to the other end of your cable and repeat the stripping process from Step 2.
- Slide the Connector: Push the PAL male compression connector onto the cable until the dielectric is flush with the internal base.
- Compress the Connector: Use your compression tool to secure the PAL connector onto the cable. Give it a firm squeeze to ensure a solid connection.
Common DIY Mistakes and How to Avoid Them
- Using the Wrong Tools: Don't use pliers to cut the cable or a knife to strip it. This almost always leads to a damaged cable and a poor connection.
- Stray Braid Wires: Double-check that no strands of the braided shield are touching the center conductor.
- Incorrect Stripping Length: A strip that is too long or too short will prevent the connector from seating properly.
- Using Screw-on or Crimp-on Connectors: While they exist, compression connectors offer far superior reliability and signal integrity. It's worth investing in the right tool.
Testing Your New Cable
Once both connectors are attached, it's time for the moment of truth. Connect the F-Type end to your wall outlet or antenna source, and the PAL male end to your television. Power on your devices and run a channel scan. If you've followed the steps correctly, you should be rewarded with a crisp, clear picture.
The Professional Touch
By creating your own custom-length TV antenna cable, you've not only achieved a cleaner installation but also ensured the best possible signal path. This DIY project removes unnecessary signal-loss points from couplers or excess coiled cable, giving you a setup that performs as well as it looks. You now have a valuable skill for any future home theater or television installation project.

